DIY Shaggy Bob: Your Complete Guide To Effortless Style
Can you truly achieve a salon-worthy hairstyle at home, and more specifically, a chic shaggy bob? The answer, surprisingly, is a resounding yes, and this guide is your ultimate passport to that success.
The quest for the perfect hairstyle often leads us down a rabbit hole of expensive salon visits and complicated styling routines. But what if there was a way to achieve a trendy, polished look without breaking the bank or sacrificing precious time? The shaggy bob, a modern marvel of hair design, offers just that: a perfect harmony of style and ease. This hairstyle is perfect for those who want to look polished without spending hours in front of the mirror. With its layered structure and effortless texture, the shaggy bob offers a natural look that works with your hair's own movement and personality.
Whether you're looking to refresh your look, eager to embrace this chic hairstyle but lack professional experience, or simply want to enhance your skills, this comprehensive guide will provide you with all the tips and tricks to achieve a stunning shaggy bob at home. Transforming your hairstyle into a chic, effortless shaggy bob has never been easier with this comprehensive guide. Whether you're a seasoned DIY enthusiast or a complete beginner, this article equips you with all the tools, techniques, and tips you need to master the art of creating a stunning shaggy bob at home. Creating a shaggy bob at home can be a fun and rewarding experience. This guide will walk you through everything you need to know to master the DIY shaggy bob, from understanding the basics to perfecting the final touches. The shaggy bob, with its flattering layers and effortless texture, has soared in popularity, becoming a timeless favorite for its versatility and chic appeal.
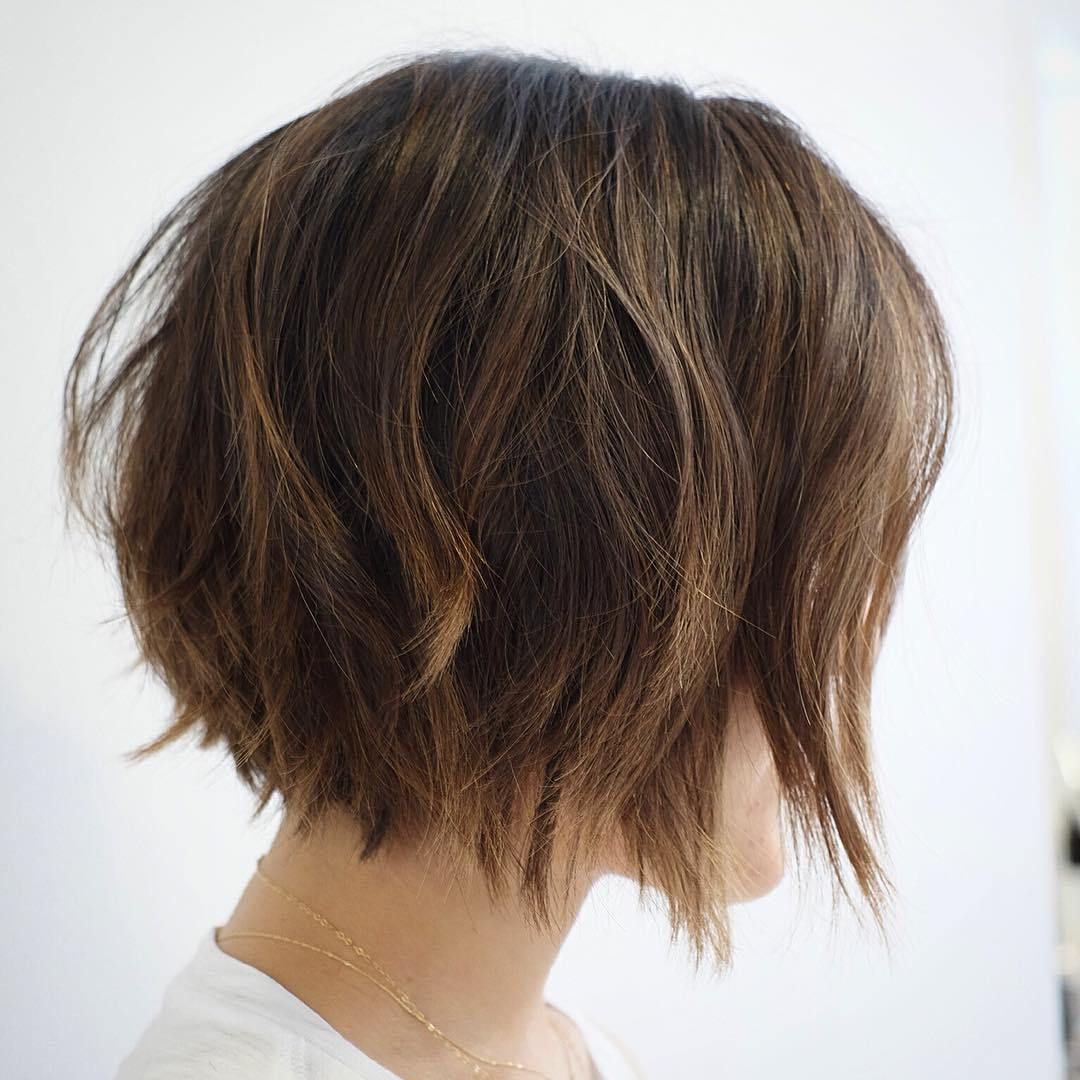
Shaggy Bob
The shaggy bob isnt just about cutting your hair; its about embracing a lifestyle that values simplicity and confidence. It's a statement, a declaration of self-assurance thats both stylish and practical. Shaggy bobs, with their effortless texture and flattering layers, have soared in popularity. They offer a natural look that works with your hair's own movement and personality.
The appeal of the shaggy bob lies in its versatility. It can be adapted to suit various face shapes, hair types, and personal styles. Whether you've got a classic bob, a blunt bob, or a layered cut already, the shaggy bob can be a fantastic evolution. This cut is all about creating movement, texture, and a sense of carefree elegance. From selecting the ideal length to nailing that signature texture, this guide will cover everything.
The journey to a perfect shaggy bob involves more than just wielding a pair of scissors. It demands an understanding of essential tools, the mastery of specific techniques, and a keen eye for detail. Its a process that can be broken down into manageable steps, making it accessible to both seasoned DIY enthusiasts and complete beginners. This comprehensive guide is your passport to mastering the DIY shaggy bob, transforming your look with confidence. This guide will explore the essential tools, techniques, and tips needed to successfully cut and style a shaggy bob at home. The shaggy bob, a modern marvel of hair design, offers just that: a perfect harmony of style and ease, a trend that continues to dominate the hairstyle scene.
This guide is designed to empower you with the knowledge and skills needed to confidently navigate the world of DIY hairstyling. Whether youre looking to save money by styling your hair at home or simply want to enhance your skills, this comprehensive guide will provide you with all the tips and tricks to achieve a salon-quality shaggy bob.
Essential Tools for Your DIY Shaggy Bob
Before you even consider picking up the scissors, it's crucial to gather the right tools. Having the correct equipment will not only make the process easier but also significantly improve the final result. Here's a breakdown of the essential tools you'll need:
- Sharp Hairdressing Scissors: Invest in a pair of professional-grade hair scissors. These are specifically designed for cutting hair and will provide a clean, precise cut. Avoid using regular household scissors, as they can damage the hair.
- Texturizing Shears: These are crucial for creating the textured layers that define a shaggy bob. Texturizing shears have teeth that cut specific strands of hair, allowing for a more natural, less blunt look.
- Hair Cutting Comb: A fine-tooth comb is essential for sectioning and guiding your cuts.
- Sectioning Clips: These clips will hold sections of hair out of the way while you work, allowing for a more organized and precise cut.
- Spray Bottle with Water: Lightly dampening the hair makes it easier to cut and helps you see the layers more clearly.
- A Large Mirror: A large, well-lit mirror is a must-have. A handheld mirror can also be helpful for checking the back of your head.
- Styling Products: Have your favorite styling products on hand, such as texturizing sprays, sea salt sprays, or volumizing mousses, to enhance the texture and shape of your shaggy bob.
Step-by-Step Guide to Cutting Your Shaggy Bob
With your tools assembled, it's time to delve into the cutting process. This step-by-step guide will walk you through the essential techniques for achieving a shaggy bob:
- Prepare Your Hair: Start by washing and conditioning your hair. Gently towel-dry your hair, leaving it slightly damp. Avoid completely drying your hair, as damp hair is easier to cut and style.
- Sectioning: Using your comb, create a center part. Then, divide your hair into four sections: two front sections and two back sections. Secure each section with a sectioning clip.
- Determine the Length: Decide on your desired length for the bob. You can measure from your chin, collarbone, or any point that suits your style. Remember to cut your hair dry for the final result.
- Cutting the Base Layer: Start with the back sections. Take a small section of hair from the bottom of one of the back sections. Hold it between your fingers and cut it straight across to your desired length. This will be your guide for the rest of the cut.
- Layering: Release the next section of hair and elevate it at a 45-degree angle. Cut the hair, following the guide from the first section. Repeat this process throughout the back sections, working your way up.
- Front Sections: Repeat the layering process in the front sections, adjusting the angle and length to create a face-framing effect. You can make the front layers slightly longer than the back layers for a more flattering look.
- Texturizing: Use texturizing shears to thin out the hair and create texture. Hold small sections of hair between your fingers and use the shears to cut into the hair at different angles. This will create a shaggy, effortless look.
- Checking and Refining: Once you've cut and layered your hair, comb it through and check for any uneven areas. Make any necessary adjustments.
Styling Tips for an Effortless Shaggy Bob
Correctly styling a shaggy bob is key to achieving that coveted effortless chic. Here are some styling tips to help you perfect your look:
- Product Selection: Choose styling products that enhance texture and volume. Sea salt spray is excellent for adding natural waves, while texturizing sprays and mousses can help create a more voluminous look.
- Drying Techniques: For a natural look, air-dry your hair or use a diffuser on your blow dryer. Scrunch your hair as it dries to enhance the texture.
- Styling Tools: A curling iron or flat iron can be used to add waves or define specific layers. Wrap sections of hair around the barrel of the curling iron for a soft, undone wave.
- Finishing Touches: Once your hair is dry and styled, use a light-hold hairspray to set your look and add a touch of shine.
Its important to know how to correctly style a shaggy bob, or the end result will be messy and unkempt. Looking for trending hairstyle in? Remember these crucial steps for a perfect finish.
Troubleshooting Common Challenges
Even with the best intentions, DIY haircuts can sometimes present challenges. Here are some common issues and how to address them:
- Uneven Layers: If your layers aren't even, go back and re-evaluate them, or you can consider the option to see a professional. Use your hair cutting comb and make necessary corrections.
- Too Short: Unfortunately, there's no way to "uncut" hair. Be sure to be conservative with your cuts.
- Difficulty with the Back: Ask a friend or use two mirrors to help you see the back of your head.
- Styling Problems: Experiment with different products and techniques until you find a style that works for your hair type and texture.
Mastering the DIY Shaggy Bob
Once you're comfortable with the basic techniques, you can explore advanced methods to customize your shaggy bob further:
- Feathering: Use texturizing shears to create a feathered effect around the face. This adds softness and movement.
- Undercutting: For a bolder look, consider an undercut at the nape of your neck. This adds a modern, edgy twist to the shaggy bob.
- Asymmetrical Cuts: Experiment with asymmetrical lengths, with one side of your hair slightly longer than the other.
Maintaining Your Shaggy Bob
Regular maintenance is essential to keep your shaggy bob looking its best. Here's what you need to know:
- Trimming: Trim your hair every 6-8 weeks to maintain the shape and prevent split ends.
- Deep Conditioning: Deep condition your hair regularly to keep it healthy and hydrated.
- Product Usage: Avoid overusing styling products, as this can weigh down your hair and make it look flat.
This comprehensive guide is your passport to mastering the DIY shaggy bob, transforming your look with confidence, whether you are a seasoned DIY enthusiast or a complete beginner. Transforming your hairstyle into a chic, effortless shaggy bob has never been easier with this comprehensive guide. Whether you're a seasoned DIY enthusiast or a complete beginner, this article equips you with all the tools, techniques, and tips you need to master the art of creating a stunning shaggy bob at home. Creating a shaggy bob at home can be a fun and rewarding experience. This guide will walk you through everything you need to know to master the DIY shaggy bob, from understanding the basics to perfecting the final touches. The shaggy bob, with its flattering layers and effortless texture, has soared in popularity, becoming a timeless favorite for its versatility and chic appeal.
Remember: If you're nervous about making major changes, start by trimming just a little. You can always go back and cut more, but you cant put hair back once its gone! Take it slow, be patient, and enjoy the process. The shaggy bob is more than just a hairstyle; it's a statement of individuality and confidence. Embrace the journey, and you'll be rewarded with a look that's both stylish and uniquely you.


